Homemade Cream Puffs with Farm Fresh Strawberries

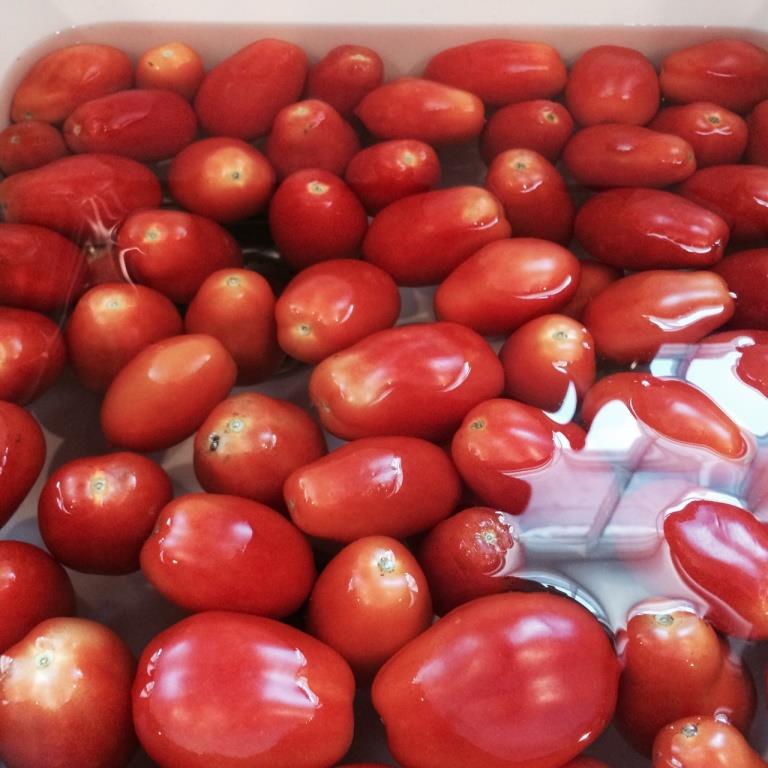
I love every bite of bliss that grows on the farm, and I get so excited for many different reasons and seasons!  When I have the first taste of a fresh strawberry, it takes me back to when I was a little girl in my moms garden.  I’m sure I consumed more berries than picked, but helping in the garden is a fond memory while growing up.  This year was no different.  My first pick of the season I had my mom join me, and we may have tasted a few before we made it out of the field.

I wanted to pair my first strawberry harvest with cream puffs.  The idea of a Pâte à Choux pastry seemed exciting and challenging.  A choux pastry is a light dough with simplistic ingredients, but no raising agent.  It uses high moisture and steam while baking to puff the pastry.  I used a tried and true recipe from my Grandma Howie’s kitchen and I’m happy to share it with you now.

Cream Puffs

  • 1 Cup flour
  • 1/4 tsp salt
  • 1 Cup boiling water
  • 1/2 Cup butter
  • 4 eggs

Cream Filling

  • 2 Cups milk
  • 2/3 Cup sugar
  • 3-4 Tbsp corn starch
  • 1 tsp vanilla

*add fresh seasonal berries

Bring water to a boil, then add butter and salt.  Stir in flour consistently until the mixture leaves the sides of the pan.  Remove from the stove and let cool for just a bit.  Slowly add one egg at a time, stirring each one until fully incorporated then adding the next.  Spoon onto a greased or non-stick cookie sheet two inches apart.  You can also put the batter into a bag and pipe onto the cookie sheet, but I was making my grandmas recipe and I can’t imagine she had time to pipe anything with nine children and a household to take care of.

Bake at 425° for 10 minutes, or until the peaks are lightly brown and the pastries have puffed up.  Then turn the temperature to 375° and continue to cook for 10 – 15 minutes, depending on your oven.

While in the oven, bring the milk, sugar, eggs, and corn starch to a boil.  Constantly stir with a whisk to alleviate clumps.  Continue to stir until filling thickens.  Add your vanilla right before removing from the stove top.

Helpful Kitchen Tip:  If you don’t have time to make the homemade filling, you can substitute with instant pudding or homemade whipped cream.

Once the cream puffs have cooled, cut in half.  Place filling inside and add fresh-cut strawberries.  Place the top back on, sprinkle with powdered sugar, and enjoy grandmas recipe!

It’s the little moments that sometimes make the biggest impact and the fondest memories.  Those are the things that really count.  “Take the time to smell the roses”, or in this case, “pick the strawberries”.    My grandma made one of the most amazing people in the world, and I am lucky enough to call her my mom.  To my grandma up in heaven and my mom by my side, THANK YOU for the little moments, because they have made all of the difference.  Love you to the moon and back.  Happy Mothers Day!

Advertisement

Mom’s Pumpkin Pie Recipe

moms-pumpkin-pie-with-whip-cream-on-top

pumpkin-pie-with-whipped-cream-close-up

As we gather around the table, grateful with blessings and loved ones, traditions are present throughout our meal and holiday.  Pumpkin pie is a standard to follow any Thanksgiving feast, but there are many variations on this classic recipe.  I asked my hubby which recipe he’d like me to make this year and he requested my mom’s pumpkin pie recipe.  I have tried other more complex recipes and he claims it just doesn’t taste as good; not enough pumpkin flavor, over spiced, not sweet.  Mom’s recipe is the best!

I like to utilize our farm produce or source local supplies when cooking, but sometimes a girl has got to use canned pumpkin. Never fear, Libby‘s 100% pure pumpkin is here; literally.  Illinois grows more ornamental and canning type pumpkins than any other state.  Chances are, the very pumpkin puree I’m using is not only produced in my state, but the pumpkins were probably grown here too!  So, even though I am using canned pumpkin, it is local and the best product out there on the market.

Pumpkin Pie Filling

  • ½ Cup sugar
  • 2 Eggs
  • 1 ½ Cups pumpkin puree (1 small can of Libby’s)
  • 1 Cup milk
  • 1 tsp cinnamon
  • ½ tsp salt
  • ½ tsp ginger
  • ¼ tsp ground nutmeg

*1 pre-made pie crust or your favorite recipe
*whipped cream to top

Simple Homemade Whipped Cream Topping

  • 1 Cup heavy whipping cream
  • 1/2 Cup sugar
  • 1 tsp vanilla

pumpkin-pie-batter-on-mixer

Lay your pie crust out into a 9” pie plate. In a mixing bowl add dry ingredients.  Add pumpkin puree, milk, and eggs.  Mix until combined, then pour filling into your pie crust.  Bake @ 375° for 40-50 minutes.

Helpful Kitchen Tip: I use a pie crust protector while my pie is baking.  This prevents the crust from over browning. I remove it when I have about 5 minutes left to give it the perfect hue of freshly baked. I also cover my pie half way through with foil so the pie doesn’t brown on top.

For the whipped topping, simply beat heavy whipping cream on high until it becomes thick (about 2 minutes on speed six for Kitchenaid mixer).  Add sugar and vanilla until thoroughly combined.

If you’d like more pumpkiny goodness ideas and inspirations, check out my Purely Pumpkin board and follow Drake Farm on Pinterest.

Blessings and love to you and your family this holiday season!

Homemade Apple Cider

Apple cider warms the soul on a crisp fall morning.  Aromas in my kitchen are an elegant dance of fresh apple and cinnamon spice.  The rust colored skyline meets with the golden harvest of the season as fall appears.

With a bushel of Jonathan apples, from our oldest fruit tree on the farm, I wanted to make a batch of cider to preserve their flavor and welcome autumn.  They are my husband’s favorite.  This apple is a classic American Heirloom variety that has sweetness with a touch of tart.  It balances the flavor and makes them a perfectly delicious apple.

I made two batches, with different ingredients, to see which recipe we liked best.  What I came up with were equally amazing.  The one batch resembles a wassail and the other leans towards a more traditional cider.  You can make both recipes and decide for yourself!  Enjoy!

apple-cider-wassail

Jonathan Apple Wassail

  • 10-12 apples, quartered
  • ½ an orange, quartered
  • 4 cinnamon sticks
  • ½ Cup brown sugar
  • 1 T ground allspice
  • 1/8 tsp ground nutmeg
  • 8-10 Cups of water

apple-cider

Jonathan Apple Cider

  • 10-12 apples, quartered
  • ¾ Cup sugar
  • 1 T ground cinnamon
  • 1 T ground allspice
  • 8 Cups water

Cut your choice of apples into quarters.  Don’t worry about peeling or seeding at this point. Everything will cook down and you will remove when you strain them.  Place apples, sugar, spices, and water into a slow cooker.  The aroma throughout the day is amazing, but you can also cook either recipe over the stove for a quicker batch.

Cook on medium to high for 4 hours.  At this time remove the apples and mash.  You can use a potato masher or immersion blender; either will do the trick.  Don’t worry about straining just yet.  Put your apple mash back into the crock pot and cook down for 2-4 more hours.  The longer you wait, the more intense the apple flavor, and delicious in my opinion.

After cooking, strain the liquid and remove all stems, seeds, and debris.  You can enjoy either recipe hot or chill in the refrigerator.

finished-cider

Concord Grape Juice Recipe – Grandma’s Way


IMG_6639

As I walk past the vines, the sweet smell of Concord grapes alert me that it is time to harvest.  When I bring my bounty home and get ready to prepare some grapey goodness, I ask my hubby which recipe he prefers; jelly, jam, puree for pie, juice… “Grape juice, grandma’s way”, he replies.

It is important for me to not only preserve our harvest, but preserve those memories he has of the farm.  My husband is fond of anything done the way they did it on the farm.  So, without delay and without an actual recipe from grandma, I begin.

Now, mind you, my husband does not cook or follow recipes.  I’m going off of stories he recollects from childhood, and for a man who doesn’t cook he does remember the steps pretty good.  The process is very simple and I’m going to experiment with the amounts of sugar, because I don’t have the actual recipe from Grandma Bossler.  I made some of the jars with ½ Cup sugar and others with 1/3 Cup sugar.  I will label them and we shall see at the time of the taste test.

concord grapes - stemmed concord grapes

Concord Grape Juice Recipe                    

  • 1 Cup Concord Grapes (heaping)
  • 1/3 – ½ Cup sugar
  • Boiling water to fill to the rim of each jar

Soak and rinse concord grapes in cool water, then drain.  I like to add some vinegar to the water and let them soak for at least 3 minutes before rinsing and draining.  While they are soaking you can set up your canning assembly line and wash canning jars.  After washing the jars in soap and water, I place them in the dishwasher on the sanitize cycle to sterilize.

Remove stems from each individual grape and place into a container for later… depending on how many grapes you have this could be a while.  Fill each sterilized jar with 1 Cup of Concord grapes.  Add sugar to each jar then fill to the rim with boiling water.

Remove lids and rings from hot water bath and place on jars for canning.  Process jars for 15 minutes in a hot water bath.  Because I didn’t have a recipe I used the Ball Blue Book Guide to Preserving for a reference on how long to process my jars.  This is a great resource and canning companion!

Once the jars are processed and cooled, make sure they have sealed properly. Label and set aside for at least 4-6 weeks while the magic happens.  When you’re ready to have your Concord Grape juice – Grandma’s Way, strain juice and enjoy the grapey goodness!

closeup of concrod grapes in jarsgrapes after canning

Summer Cherry Crisp Recipe

fresh cherries

cherry crisp with ice cream top view

A crisp or crumble recipe is a beautifully simplistic way to enjoy seasonal fruit. This recipe can be pared with your favorite fruits all summer long, whether it’s cherries, blackberries, peaches, or apples to pick.

The first crisp of the season at our house is always sour cherry.  We have many fruit trees on the farm, but my husbands favorite is THE sour cherry tree.  Although we have planted other trees, he says the one his Great Uncle Glenn planted is the best. This cherry trees fruit has the perfect amount of tart with just a hint of sweetness, and I think that’s what makes it perfect for this recipe.

Filling

  • 5-6 Cups sour cherries, stemmed and pitted
  • 1/2 Cup sugar
  • 2 T corn starch

Topping

  • 1/2 Cup (1 stick) butter
  • 1 Cup flour
  • 1/2 Cup oats
  • 1/2 Cup chopped pecans
  • 1/2 Cup brown sugar
  • 1/4 tsp cinnamon

Pour sour cherries into a 2 ½ quart baking dish and lightly toss with sugar and corn starch to coat.  In a stand mixer, cream butter and brown sugar.  Add flour, cinnamon, oats, and chopped pecans.  Beat on a low speed until mixture is combined and slightly crumbly.  If mixture is still sticky, you can add more flour.  Top sour cherries with crisp and bake in an oven @ 350° for 20-30 minutes, until bubbling and golden brown on top.  After your crisp has cooled from the oven, serve with a scoop of vanilla ice cream and enjoy!

IMG_6291 IMG_6292 IMG_6295completed cherry crisp from oven

“A Pinch of That, Sprinkle of This, Measure to Taste” Cream of Asparagus Soup

Cream of Asparagus soup picture

I’m always so excited to see the first signs of asparagus peeking through the soil announcing spring. The alarm for fresh produce has rung, and I look forward to the season of delicious farm fresh food!

“A pinch of that, sprinkle of this, measure to taste”, is the characteristic of a great chef and a great recipe.  As you learn to cook and experience flavors, you don’t always have to follow a recipe to a T, but merely a list of ingredients to guide the way.

I enjoy trying new recipes as I learn to cook with my produce on the farm.  I had some cream of asparagus soup at a Grange membership dinner and asked the cook for the recipe.  Of course, like many family recipes, the ingredients were not measured and the directions were not written down.  She sent me her list and my recipe was adapted from that.

In our house, we like soup to be full or heavy.  I opted to partially blend half of this recipe, leaving behind delicious bits of asparagus and potato.  I also added cream instead of milk and chicken broth for some extra flavor.  But, as I encourage everyone to make a recipe your own, feel free to add a pinch of that, sprinkle of this, and measure to taste!

Cream of Asparagus Soup Recipe

  • 1½ – 2 lbs asparagus
  • 2 T butter
  • 1 large potato, chopped
  • 1/4 Cup onion, chopped
  • 3 cloves garlic, chopped
  • salt and pepper to taste (I used 3/4 tsp salt, 1/2 tsp pepper)
  • 4 Cups chicken broth
  • 1/2 Cup heavy cream
  • *1/4 Cup Asiago/Parmesan/Romano cheese blend to sprinkle on top of soup

Wash asparagus and break the end pieces off of the spears.  The asparagus will naturally break at the tender area leaving the woody ends to discard.  Chop spears into 1 inch pieces, along with chopping the potato, onion, and garlic.

Saute garlic, onion, potato and asparagus in butter for about 5-7 minutes, or until potatoes and onions are lightly browned.  Sprinkle with salt and pepper.  Stir in broth and heavy cream, then bring to a boil. Simmer for 15 minutes until the asparagus pieces are tender.

Helpful kitchen tip:  Tasting is an important part of cooking.  At this point, taste your broth and see if you’d like to adjust your seasoning.  You can add more salt, pepper, or thyme would be a complimentary ingredient.  If the soup is overpowered by any one ingredient, you can always add more chicken broth to lessen the intensity if you over seasoned.

Using an immersion blender, partially blend half of the soup.  If you prefer a creamy soup with no vegetable pieces, blend the entire pot of soup.  Top with a sprinkle of cheese before serving and enjoy!

Cooking with Chef Natalie – Bacon Wrapped Asparagus and Creamy Baked Asparagus

IMG_3190

Meals are an experience at our household, whether you’re hands on in the kitchen while the festivities begin, enjoying a glass of wine while we stir up some fun, or awed by the serenade of cuisine set at the dinner table.  Tastes, smells, and sites to be seen as your senses dance with excitement.

I enjoy cooking and nothing makes me happier than seeing the fresh produce I’ve grown on my farm turned into delicious recipes for everyone to enjoy!  Early spring asparagus is so exquisite I normally take a simplistic approach to recipes not to overshadow the fresh flavor.  I invited Chef Natalie to my kitchen to prepare two asparagus recipe’s to accompany our dinner.

cooking with Natalie 01Natalie cooking 04 edited blanching asparagus 02

You should always use the best ingredients that are made available to you and that fits your budget.  It’s a simple tip but one that makes a huge difference.  We used fresh thick cut bacon from our neighbors farm to flavor and accompany our home-grown asparagus.

Bacon Wrapped Asparagus

  • 1 1/2 lbs. Fresh asparagus spears
  • 5 – 8 Pieces of fresh-cut bacon
  • 2 T Olive oil
  • * Black pepper to taste

Clean the asparagus and break off the end pieces.  The stem will naturally break at the tender spots and you can discard the end pieces for compost or use to flavor soups.  Lightly brush the asparagus with olive oil and pepper to taste.  Spiral wrap 2 – 3 pieces of asparagus with bacon.  You can secure the pieces with a tooth pick before grilling if needed.  Place the asparagus on the grill and cook until bacon is crisp and spears are tender.

grilled asparagus IMG_3187 FullSizeRender[2] Creamy baked asparagus

Creamy Baked Asparagus

  • 1 lb.  Fresh asparagus spears
  • 1/4 Cup  Peppercorn Ranch Dressing
  • 1/2 Cup Grated Smoked Gouda Cheese
  • 12 Ritz Crackers, coarsely crushed (about 1/2 cup)

Preheat the oven to 350°F.  Clean asparagus spears, remove ends, and blanch in water for 2 -3 minutes.  The asparagus should be bright green and still crisp.  Drain and place in a baking dish.  Add dressing and toss to coat, then sprinkle crushed crackers and top with smoked gouda cheese.  You can substitute the gouda for parmesan or cheddar cheese if you have that on hand, but trust me the gouda is good.  Bake in the oven for 10 – 12 minutes until  the top is lightly golden and crisped.  This recipe was modified from the original on KraftFoods.com.

» If you’d like to grow your own, check out my recent “How To” post on Planting Asparagus!

A Taste of Summer Throughout the Winter: Canning Salsa with Recipe

salsa finished

Of Course I Can, and you can too! This is only my second summer of canning and with each recipe I learn how to be more efficient and comfortable with preserving our farm bounty. There are many helpful tutorials online and I use the Ball Blue Book – Guide to Preserving as my go-to kitchen reference for all things canning. The most important step to remember is following the sanitary and processing guidelines. Safety first!

It has been a busy summer and I have learned so much from my apprenticeship at Riverbend Roots Farm. The team I work with are more like family then coworkers and I hate the idea of leaving them.  My bosses Kris and Stacy are amazing farmers who share a passion for bringing naturally grown farm fresh produce to customers, as well as, sharing their knowledge with aspiring farmers-in-training. I am so lucky I have had this opportunity to learn from the best.

I’ve been applying what I learn to our farm and have had a successful harvest this season. I’m eager to move forward on a larger scale next year as I follow my farmDREAM. I love the fresh goodies provided during the farm season, but what about when the weather turns cold? Well, canning and preserving will give me a taste of summer harvest throughout the winter.

This year I decided it was long overdue to can salsa. This recipe is my first attempt and I’ve been receiving positive feedback thus far. I use what’s available at the farm and have noted the measurements that appeal to us, but if you prefer more or less of something make the adjustments and you will have great salsa every time! The best thing about any recipe is that you can make it your own.

Homemade Salsa Recipe

  • 10 Cups tomatoes; peeled, cored, chopped, which takes about 8 lbs of fresh tomatoes
  • 1 bell pepper
  • 1/3 Cup seeded, chopped jalapeno peppers (about 5 small jalapenos)
  • 5 Cups chopped onions (1 large red and 4 small yellow)
  • 4 cloves garlic or 2 tsp minced garlic*
  • 1 Cup lime juice*
  • 1 bunch of fresh cilantro (about 1-2 Cups)*
  • 1 ½ teaspoon ground cumin
  • 1 ½ tsp salt
  • 1 tsp black pepper

*½ tsp minced garlic = 1 clove of fresh garlic

*Acidity is needed for canning. You can also use lemon juice or cider vinegar but I find lime juice has the best taste for salsa.

*based on your taste you can add 1-2 Cups of fresh cilantro. I use 2 cups when cooking my recipe because we love cilantro! In addition I chop ½ cup fresh cilantro and mix into salsa before serving.

tomato bath

1.  Place whole tomatoes in a pot of boiling water for 30 seconds and then immediately remove and place them into an ice water bath. Remove from the water and easily peel skins.

2.  Dice tomatoes and remove seeds.  After measuring 10 Cups of tomatoes I pour into a strainer to remove excess water.

3.  Remove seeds and veins from jalapeno peppers. If you like your salsa hot you can leave some of the seeds and veins intact. Chop peppers, onions, garlic and cilantro.

4.  Add all ingredients into a large stock pot. Add seasoning; lime juice, ground cumin, salt and pepper to taste. Bring all ingredients to a simmer and allow to cook for 18 minutes.
cooking salsa in stockpotSanitize glass jars, rims, and lids in hot water bath for use. Once your salsa has been cooked pour the hot batch into sanitized jars and twist lids tightly.

Process jars in a boiling water canner for 15 minutes. Once jars have cooled check center of lid and make sure the safety seal does not pop. If there are any jars that did not properly seal you can place in the fridge and use right away. You can also freeze the salsa.

I use what’s available at the farm and have noted the measurements that appeal to us, but if you prefer more or less of something make the adjustments and you will have great salsa every time!

Jalapeño Margarita Recipe

Jalapeno Margarita

Turn up the heat on your Cinco De Mayo and add a kick to your margarita recipe.  The jalapeño margarita is my new housewife cocktail of the summer.  The perfect blend of lime and sweetness married with a hint of heat on the palette.

Jalapeño Margarita

  • 3 – 6 slices jalapeño
  • 2 oz fresh squeezed lime juice
  • 2 oz orange liquor (I prefer Grand Marnier® or Cointreau®)
  • 2 oz agave nectar
  • 4 oz (I prefer Hornitos® – 100% agave tequila, Don Julio, or Tres Generaciones®)

Muddle the jalapeño slices, then pour lime juice, orange liquor, agave nectar, and tequila into cocktail shaker.  Top with crushed ice and shake vigorously.  Salt the rim of a margarita glass and serve cocktail with a garnish of fresh lime wedge or jalapeño slice.

*Agave nectar is a great sweetener for cocktails because it mixes with cold beverages, unlike honey.
*You can substitute fresh lime juice with Nellie and Joe’s Key West Lime Juice found at your local grocery store.

Chocolate Valentine’s Day Treats for My Sweets ♥

Whether your cooking for yourself, that significant other, or sharing with a friend, it’s always nice to make something special to say I LOVE YOU!  This is a very simple and delicious chocolate dessert that I’ve made a bit more classy and I hope you enjoy.  Happy Valentine’s Day to everyone who follows our blog and our farmDREAM!

Chocolate Brownieheart shaped treats fresh from the oven

  • 5 Eggs
  • 2 Cups sugar
  • 3/4 Cup flour
  • 3/4 Cup vegetable oil
  • 1 Cup semi-sweet chocolate chips
  • 1/2 Cup unsweetened cocoa
  • 1 tsp vanilla
  • 1/2 pint fresh raspberries
  • Bakers white chocolate for dipping

Simple Chocolate Gnash

  • 2 Cups Cool Whip
  • 1/2 Cup semi-sweet chocolate chips

Whipped Cream

  • 1 pint heavy whipping cream
  • 1/2 Cup sugar
  • 1 tsp vanilla or amaretto

heart shaped panMix all brownie ingredients together and pour into a well greased multiple heart shaped pan or you can use an 8×8 baking dish.  Bake at 350° for 25-30 minutes.  Allow to cool on a baking rack while you prepare your chocolate gnash and homemade whipped cream.

Before I prepare the whipped cream and gnash I warm Bakers white chocolate in the microwave and dip raspberries to top my dessert.  You can use any of your favorite fresh berries.

chocolate valentines treats 14Melt the semi-sweet chocolate chips in the microwave and fold into the Cool Whip.  Warm the cool whip in the microwave for an additional 20 seconds.  Mix together until well blended and smooth.  Drizzle over your cake brownie.

In your mixer beat the heavy whipping cream until it becomes fluffy and stiff.  Slowly add sugar and vanilla.  I have homemade amaretto so I like to add this to my whipped cream sometimes.

Top with the chocolate dipped berries and enjoy!